Share
Pin
Tweet
Send
Share
Send
The kids will definitely make friends with a cute green miracle beast that can also shine!
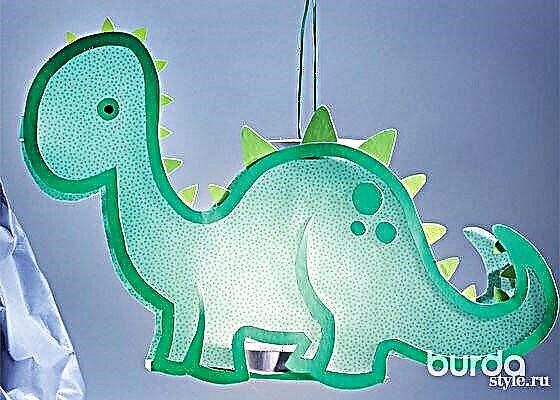


2. DINOSAUR: from the sheet of patterns to retake the contours of the template. The eyes, dots and dividing lines between the legs should be taken separately. Number the teeth from left to right and cut. The contours of the body of the dinosaur translate 2 times (symmetrically) on the back side of the green photocardboard. Inside the dinosaur, along the contours, draw an edge 1.5 cm wide. Cut the edge. From the remains of the cardboard cut out the eyes, specks and dividing lines between the legs 2 times (symmetrically for the front and back sides of the dinosaur). In front of the eyes, draw a pupil with a black marker. Place the cut edges of the dinosaur and dividing lines on the transparent paper, place the lower ends of the dividing lines under the edges of the dinosaur. Glue parts to transparent paper, stick on eyes and specks. When the glue dries, cut off the protruding edges of the paper. From the yellow photo paper, cut out the cloves (with allowances at the lower edges of 1.5 cm) and stick them under the upper edges of the dinosaur parts according to the numbering.
3. DESIGN OF THE FLASHLIGHT: measure the diameter of the round box. Glue a tea candle in the middle of the box. From the remains of the cardboard, cut out the rectangular bottom of the flashlight with a length of 18 cm and a width equal to the diameter of the box plus 3 cm. Glue the box on the rectangle exactly in the middle, turn the protruding long edges of the rectangle up to 1.5 cm wide. Glue the front and back sides of the dinosaur. Cut out the middle of the box lid so that there remains an edge 1.5 cm wide. Cut off 35 cm wire cutters, bend the wire with an arc (handle). Fix the ends of the handle to the lid on both sides. Glue the upper edges of the front and back of the dinosaur to the lid. Bend one end of the remaining wire to hang the flashlight, wrap the other end of the wire around a wooden stick. From the cardboard cut 2 jumpers 2 cm wide and a length equal to the width of the bottom of the flashlight plus 3 cm. Bend the ends of the jumpers 1.5 cm wide. Glue the jumpers between the front and back sides of the dinosaur to the head and tail.
PHOTO: ANDREAS AHMAN. DIRECTION: RASHANA JENNINGS
Material prepared by Julia Dekanova
Share
Pin
Tweet
Send
Share
Send