The selection contains a variety of ideas on how to make balls with your own hands and how to decorate simple ready-made balls.
1. Ball with patchwork applique

Simple, but very elegant: patchwork balls! You will need glue for decoupage and colored fabric. From the ball you need to remove the loop and put the ball on a stick or pencil: it will be easier to work. Cut the cloth into small pieces and. After putting glue on the ball, stick one at a time, also glue on top. A loop sewn from one of the types of fabric used in the mosaic will look good as a loop.


Photo and source: simplysewingmag.com
DIY mini-Christmas trees: 8 ideas with instructions
2. Ball with fabric mosaic

To create such a ball, you need a spherical foam blank (sold in needlework stores). First you need to come up with a pattern, make markings on the ball and cut lines with a breadboard knife. Then - prepare shreds of fabric (their size should be 2-3 cm larger than the size of the section of fabric mosaic for which each is intended). Use small scissors or a spreader to tuck shreds in the slots (see photo). Excess tissue can be trimmed. When the mosaic is ready, you can additionally decorate the ball with pins with sequins, beads, beads strung on them. On the pin, you can put a bow and eyelet.


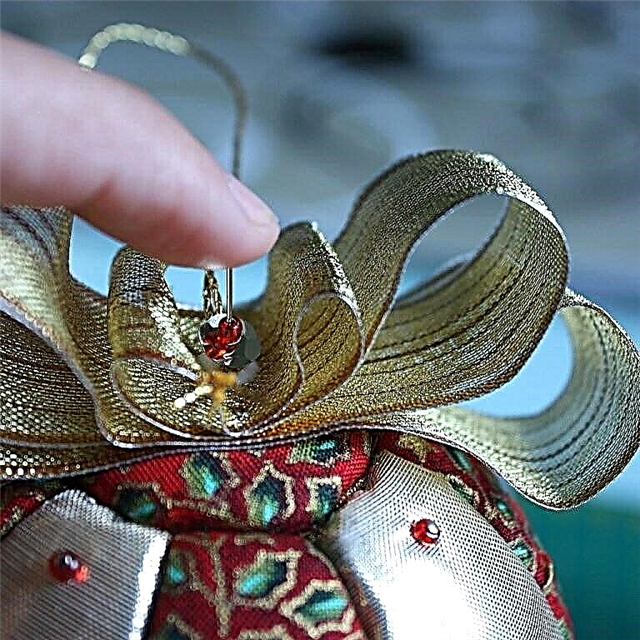
Photo and source: crisdemarchiatelier.com
Christmas garland decor: 12 ideas with instructions
3. Balls with pictures

A simple and imaginative idea: if you have Christmas balls without a pattern, decorate them by adding pictures using the decoupage technique. Stickers or decals are also suitable. An option for those who can and love to draw is painting with acrylics (for smooth glossy glass balls, take acrylic on glass, for matte or plastic universal acrylic is suitable).

Photo and source: thecraftedlife.com
The most unusual Christmas trees that you can do yourself: 15 ideas
4. Transparent balls with painting and beads inside

You will need transparent balls without a pattern, markers, stained glass paints in tubes with a thin nose and a variety of beads. The inscription (or drawing, if desired) must first be printed / drawn on paper. Remove the loop from the ball. Insert the paper inside the ball and transfer the inscription onto the ball using a marker. Then repeat the drawing with paint, and when it dries, add into the beads and put the loop back. You can add a suitable bow from the ribbon.


Photo and source: tingandthings.com
How to sew a pig, a symbol of 2019: 4 workshops + patterns
5. Sprinkled balls

Another option for decorating simple transparent balls: multi-colored confectionery topping! In addition to balls and topping, you will also need a transparent liquid glue (when drying, the glue should also remain transparent - you should test it before work). So, remove the loops from the balls, fill in enough glue inside and rotate the ball so that the glue covers the entire inner surface, and then fill in the sprinkle inside so that the decor sticks to the inner walls of the ball.


Photo and source: gimmesomeoven.com
How to make a skirt for the New Year tree: master class
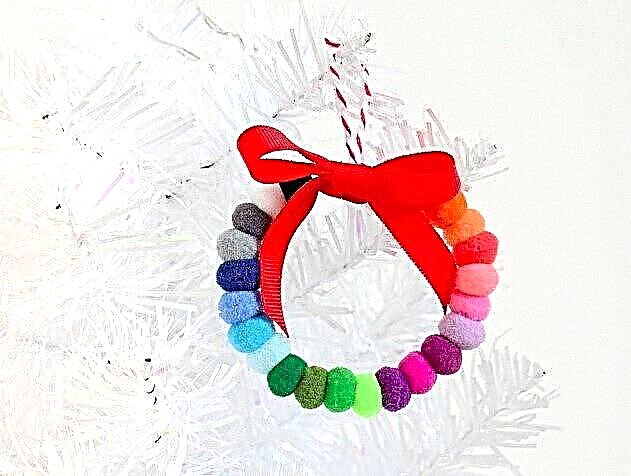
6. Ball made of felt balls

For such a ball, you need a foam base in the shape of a ball (sold in needlework stores), a sufficient number of felt balls and tailor pins - the thinnest, with a clove head. Each felt ball is pinned to the base with a pin, while a lace or ribbon is attached to the pin, which will act as a loop.

Photo and source: northstory. ca
Christmas soft toys from felt
7. Round decoration made of felt balls
These jewelry will look good together with the balls from the item above.Felt balls are strung on a wire, the ends of which are fastened. A loop and a bow are added to the attachment point.

Photo and source: northstory. ca
8. Flat "balls" with watercolor painting

These "balls" will definitely not break, because they are made of thick paper! In addition, they can be decorated with paintings according to your desire. First, on a thick watercolor paper, you need to draw a ball outline. Then - colorize it by drawing patterns. It remains to cut the "ball" (do not forget the loop) and add the ribbon or lace-loop. By the way, painting can be done not only with watercolors - most importantly, take a fairly thick paper.

Photo and source: inkstruck.com
9. Gold Balls

These balls are real works of art! To make such simple transparent balls, you need liquid paint, potal (very thin foil to simulate gilding, sold in shops for artists), glue for potal (you can find it there) and a wide, flat, fairly dense brush. We release the balls from the loops. Pour paint inside and turn the ball so that it covers the inner surface of the ball. Outside, we apply glue for potal on a part of the ball, wait for the necessary time (see instructions), apply a piece of foil, press it with a brush, remove the non-sticky residue with a brush as well. At the end - a loop from a beautiful ribbon.


Photo and source: thesweetestoccasion.com
10. The embroidered "balls" in the mini-hoop
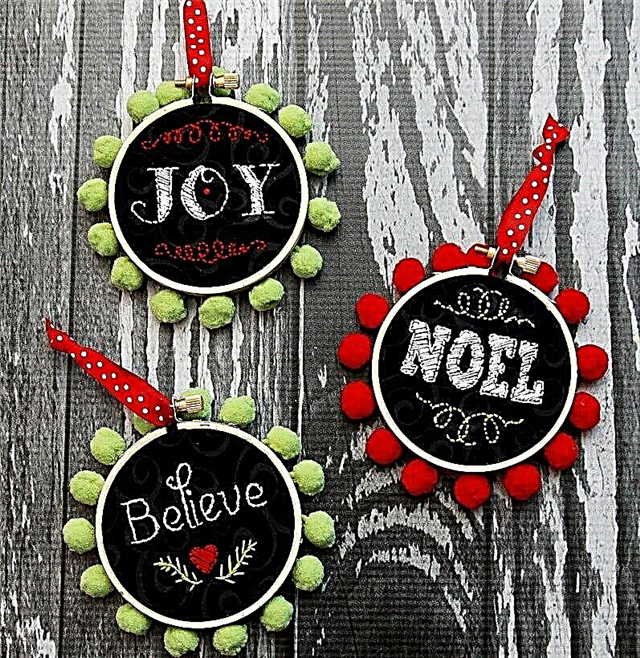
Idea for those who like to embroider. It will take a few hoops of the smallest size, shreds of fabric, floss, braid with pompoms and glue. After embroidering, cut off the excess fabric and glue them to the hoop, turning inside out. Then glue the tape on top, as shown in the photo. Add a loop.


Photo and source: sugarbeecrafts.com
11. Balls with a mosaic from CD

You will need transparent balls, glue, an unnecessary CD and a shred of beautiful fabric. The disk must be cut into pieces, from which then to assemble a mosaic on the surface of the balls, planting pieces of the disk on glue. You can cover the ball with a denser mosaic (then it is better to make the pieces small) or, as in this example, leave gaps through which the "filling" of the ball from a beautiful fabric will be visible.

Photo and source: cremedelacraft.com